Wednesday, February 1, 2012

Pin it and win it!

Just when you're feeling like nothing is going your way. BAM! Something good comes along! Life's funny that way. My artfire studio  has been just languishing in January, I've been working hard on promoting, spending way to much time on Facebook, but I haven't been able to shake the January doldrums. Maybe it's the weather, or economy. Anyway, I haven't worried about it too much. I figure time has a way of evening out things-just like in life. At least I been busy taking some new soldering classes and being able to create a lot of new items!

Well Artfire started a new promotion-Pin it and win it.  What's Pin it? Well If you haven't heard about Pinterest yet you will soon. Think of it as a virtual scrapbook-anything you can see online you can pin, recipes, inspirations, pets, people, places, things, flowers, wedding ideas, cookies, holidays, Valentines, Christmas ,New Years, Easter, ......Oh it does get crazy and addictive! See how easy it is to get side-tracked...Well Artfire has jumped on to the Pinterest bandwagon to. To get Artfire members using Pintrest, that came up with a promotion, first Artfire members would tweet or post on facebook an item from their studio that they would like Artfire to promote, then Artfire would randomly select one of those items  and put it on the Artfire pin board. Members of Pinterest would (hopefully) repin the item and at the end of the week Artfire would buy it for one of the repinners. So have I confused and lost you? The details can be seen in this forum posting. "Pin it and win it!".

For the first item in this promotion my Sea Glass Bracelet was chosen! Not too bad, considering I only tweeted it and posted about it once. It is my lucky day!


So if you are on Pinterest here's the link to the Artfire board.  Maybe you'll be the lucky person that wins this! Anyway, be sure to check out Pinterest. it's fun, and oh yeah...it gives you another excuse to stay up to 3 in morning!

Saturday, January 21, 2012

This is what I learned this week

I learned a new wire wrapping technique this week. This is the first wire wrapped pendant I've made. I think it came out pretty well! The stone is a faceted smoky topaz. I think it looks pretty good with the copper wire. I was happy to take a class locally at Armstrong Tool and Supply. If you need jeweler's tools or supplies you might want to check them out. Don and his staff are the greatest to work with. They specialize in all sorts of tools and in addition to jewelers' bench tool and supplies they carry casting equipment, mold materials, sheet metals, boxes, display items, silver chain, silver findings, and Sterling Silver sheet and wire in a variety of sizes.

I can't wait to get my order of wire in hand. I'm thinking about using some mixed metals in my next few pendants! I originally took this class so that I could wrap some of my sea glass pieces that I have. I can't wait to get started!

Thursday, January 19, 2012

Complimentary Colors


My sea glass earrings have been featured in this collection today. Actually I've been having my items show up quite a few times this week in collections on Artfire. That makes me very happy! I hope you will take a look at some of the artisans that have been featured. BE sure to look for the sea urchins!

Sunday, January 8, 2012

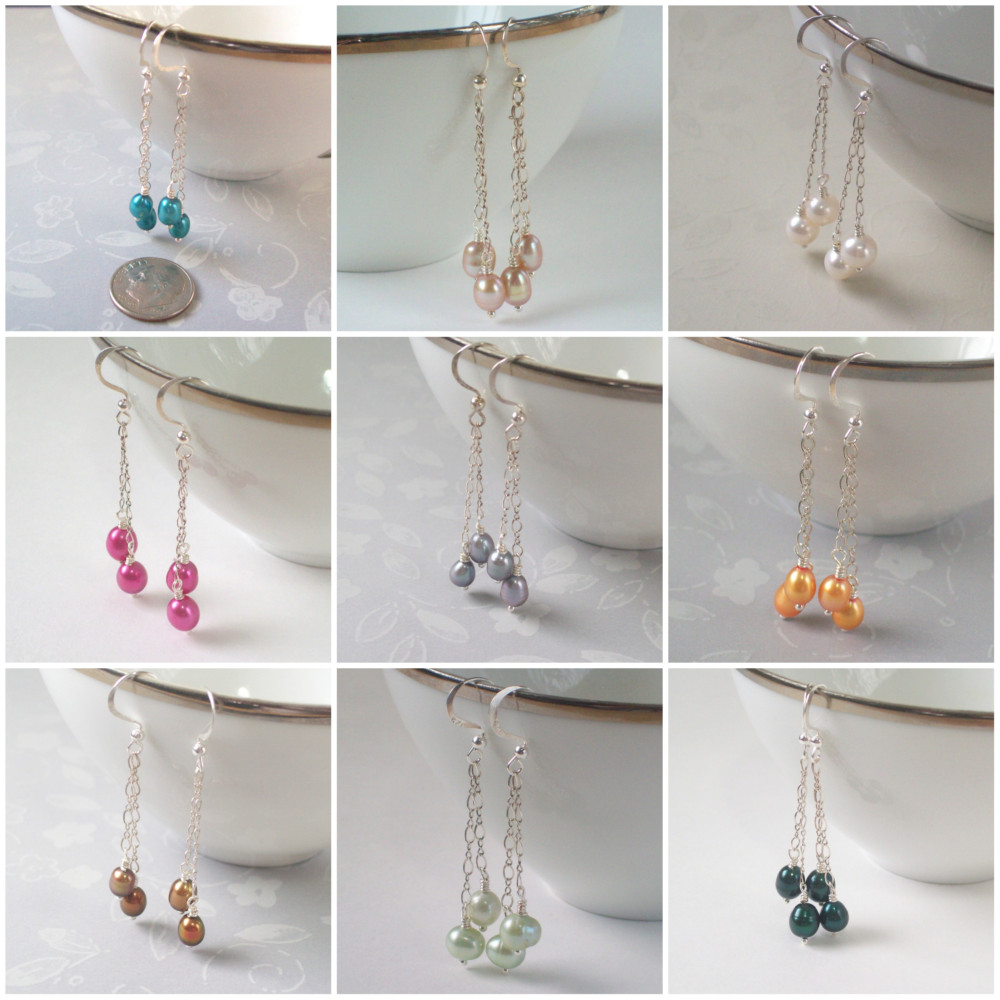
I've been busy making earrings!

I thought I'd get busy and add a  few new pairs of earrings to my studio, so I sat down the other day and started making earrings. And when I stopped I had over 24 pairs of earrings! I really like this style of pearl earring. It's simple and elegant. I was lucky to find a great bunch of pearls at one of my favorite local jewelry suppliers. If you're in the Berkley, Michigan area you have to stop into Munro's  I just love to pick out my materials in person. Sometimes you find new shades of pearls, or great new stones. I find all sorts of new and exciting items. I know that after the big gem shows in Tuscon, I'll be able to see lots of new things.

How often do you get to sit down and just create?  I treasure the time when I'm all alone at home-and that's not often and can just sit down and make new pieces. Sometimes it hard to carve out time in our lives. But, all things in balance.

How do you create time for yourself?

Tuesday, December 20, 2011

Pierogi Recipes from my kitchen to yours

My Pierogi making partners 2011
I want to share my family's pierogi recipe with all of you. It wouldn't be Christmas in my house without that favorite traditional Polish food, the pierogi. For those of you who don't know what a pierogi is, think of it as a large, stuffed dumpling. In our family we made 3 kinds of pierogi, potato-cheese pierogi, sauerkraut pierogi and plum pierogi. The dough is the same for all of the pierogi-only the pierogi filling recipe changes.

Pierogi dough:
4 cups white flour
4 whole eggs plus 2 egg yolks
1/4 tsp. salt
1 cup sour cream

Measure flour into a large bowl. Add eggs, salt and sour cream. Mix together. I use a mixer just to get the dough started and then hand knead to finish. You don't want to overwork the dough or it will be tough. The dough will begin to form a ball as you knead the dough. If the dough is sticky, add a little additional flour and knead a bit more. Cover with a towel and let rest about 10 minutes.

Roll the dough out on a lightly floured surface-a counter or kitchen table is a great place to use. I roll the dough about 1/4 thick and then cut dough in circles with a lightly floured glass or biscuit cutter. I then roll the circles out again to about 1/8 inch think and a slightly oval shape.


Put the filling in the center of your dough. Fold over and seal the edges. Here's a tip save the water from your potaoes and use the starchy water on your fingertip to run around the inner edges of the dough. Pinch and crimp well to seal the edges.

Drop into a pot of boiling salted water until the pierogi float. About 5-7 minutes. Drain and rinse in cold water. To prevent the pierogi from sticking to each other butter the boiled pierogi and stack between sheets of waxed paper.

To serve the pierogi, saute in butter until they just start to brown. As Aunt Sophie always said to me, don't let them get brown! Serve with sour cream. Smacznego!

Pierogi Filling Recipes:
Potato-Cheese Pierogi Filling

2 lbs peeled potatoes-about 6 cups-boiled, mashed and cooled.
1 cup of minced onion
1/4 cup butter
1 lb farmers cheese if you can't find farmers cheese in you market, you can use 2 lbs cottage cheese that has been well drained in a cheese cloth.
 salt and pepper.

Saute the minced onion in butter until soft and lightly golden. Add to mashed potatoes, mix in farmers cheese and season to taste with salt and pepper. Use about 2 Tablespoons of filling to each pierogi.
Okay-I used 10 lbs of potatoes!


Sauerkraut Pierogi Filling:

1 large can or jar of sauerkraut
1 oz dried Polish mushrooms (you can substitute any dried mushrooms)
1 cup minced onion
1/4 cup butter

Rinse and drain sauerkraut. you can chop it if you like it finer. Simmer dried mushrooms in water until soft-about 15 minutes. Drain and rinse well to remove any grit. Chop until finely minced. Saute chopped onions in butter until light golden yellow. Combine all ingredients together. Use about 2 tablespoons of filling per pierogi.

Plum Pierogi Recipe:
1 large can of plums.

Drain plums. Remove pits from plums. Use 1 plum per pierogi. My Aunt Kay would dip the boiled pierogi into butter and then into fine white bread crumbs and then saute them in butter.

Sweet Cheese Pierogi Filling Recipe:
1 lb farmers cheese
1/4 cup sugar
1tsp. vanilla extract
1 egg
1/4 tsp. salt
1 tsp. grated orange rind
Mix together ingredients. If you can't find farmers cheese, you can substitute 2 lbs of small curd cottage cheese that has been pressed through a cheesecloth to make a dry cottage cheese. Use about 2 tablespoons of filling per pierogi.

I'd like to thank my brother Adam, who compiled a recipe book of our family's traditional family recipes. Thanks to his hard work, those memories, stories and recipes are preserved for future generations of our family.